
One of the great things about Swift is that is it now available on platforms other than just OSX and iOS (and watchOS and tvOS…), most notably Linux, and directly from swift.org. This has opened the door for efforts to write backend code in Swift and Vapor is one of the frameworks aiming to make this easier.
While you can do all development on Linux directly, the reality probably is that for the moment code will be written on a Mac and then compiled on Linux as a deployment platform in a second step if only for the reason of having an IDE available with Xcode.
It can be tricky to set up an environment for cross-compilation or a virtual machine compilation target where you check out or copy your code for running. With Vapor and its support for Docker in the command line interface this actually becomes as easy as:
vapor docker runwhich is the equivalent of running
vapor build
vapor run
on the Mac. Here is a short video showing what this will look like:
Requirements
The only thing you need (besides having Vapor installed) is Docker. If you already have Docker installed, you’re good to go. If not, head over to the Docker installation instructions and download the Docker Toolbox.
A Note on Docker Toolbox vs Docker Mac beta
One notable difference between Docker on the Mac and Docker on Linux is the level of system integration. Docker uses Linux-specific kernel features and as such does not run on the Mac directly. Instead it runs on a virtual machine, which you interact with via the docker and docker-machine command line interfaces.
The former controls the images and containers while the latter deals with the virtual machine specifically. For instance, docker ps shows the docker containers you have running, while docker-machine ls shows what docker machines you have configured (it could be more than one - and it doesn’t even have to be local to your Mac!).
What does this have to do with Docker Toolbox and Docker Mac beta?
The Docker Mac beta is going to replace Docker Toolbox at some point in the future and it essentially provides similar integration on the Mac as on Linux. (Not in the technical sense, there is still a virtual machine running, but it behaves the same from a user’s perspective.)
Is docker-machine useless then?
Definitely not, because as mentioned above, docker-machine handles remote docker hosts. What appears slightly more complicated when you develop locally is actually just a taste of what you can do with docker-machine when interacting with remote docker hosts, because instead of a local Virtual Box instance, the remote can be a Digital Ocean instance. You interact with it in the exact same fashion.
Creating a Docker Image
In order to run a Vapor app in a a Docker container, you need an image with the appropriate Swift version. The Vapor command line interface has a way to create such an image and it expects that image to be set up for building and running in a container.
There are the steps to create a docker image. Note that you only need to do this once for each Swift version, so this should be a relatively rare operation.
First create a directory. We’ll only need this to download a Dockerfile into and it can be removed after the image has been built.
mkdir tempNext change into the temp directory and get the Dockerfile by running
vapor docker initThe Dockerfile holds the instructions to build the image and it takes as a parameter the Swift version it should install. Vapor’s support for Docker is set up to automatically pick up whichever Swift version has been configured via swiftenv(https://github.com/kylef/swiftenv), a tool to manage swift versions.
In order to build a Docker image for a specific Swift version, set it up locally by running
swiftenv local DEVELOPMENT-SNAPSHOT-2016-05-09-afor instance. (In a future update to vapor docker init this will probably be done in a single step with a parameter.)
With that done, you can run
vapor docker buildto create the image. This may take a few minutes as it will pull down the base image and packages. You can run docker images to inspect the result:
$ docker images --format "table {{.ID}}\t{{.Tag}}\t{{.Size}}"
IMAGE ID            TAG                                 SIZE
93d8a59ec90c        DEVELOPMENT-SNAPSHOT-2016-05-09-a   959 MB
e194582ff0a5        DEVELOPMENT-SNAPSHOT-2016-05-03-a   1.241 GB
Building your project
As outlined above, once you have Vapor and Docker up and running and the image created, all it takes to build and run your project in a docker container is
vapor docker runIt should look like this:
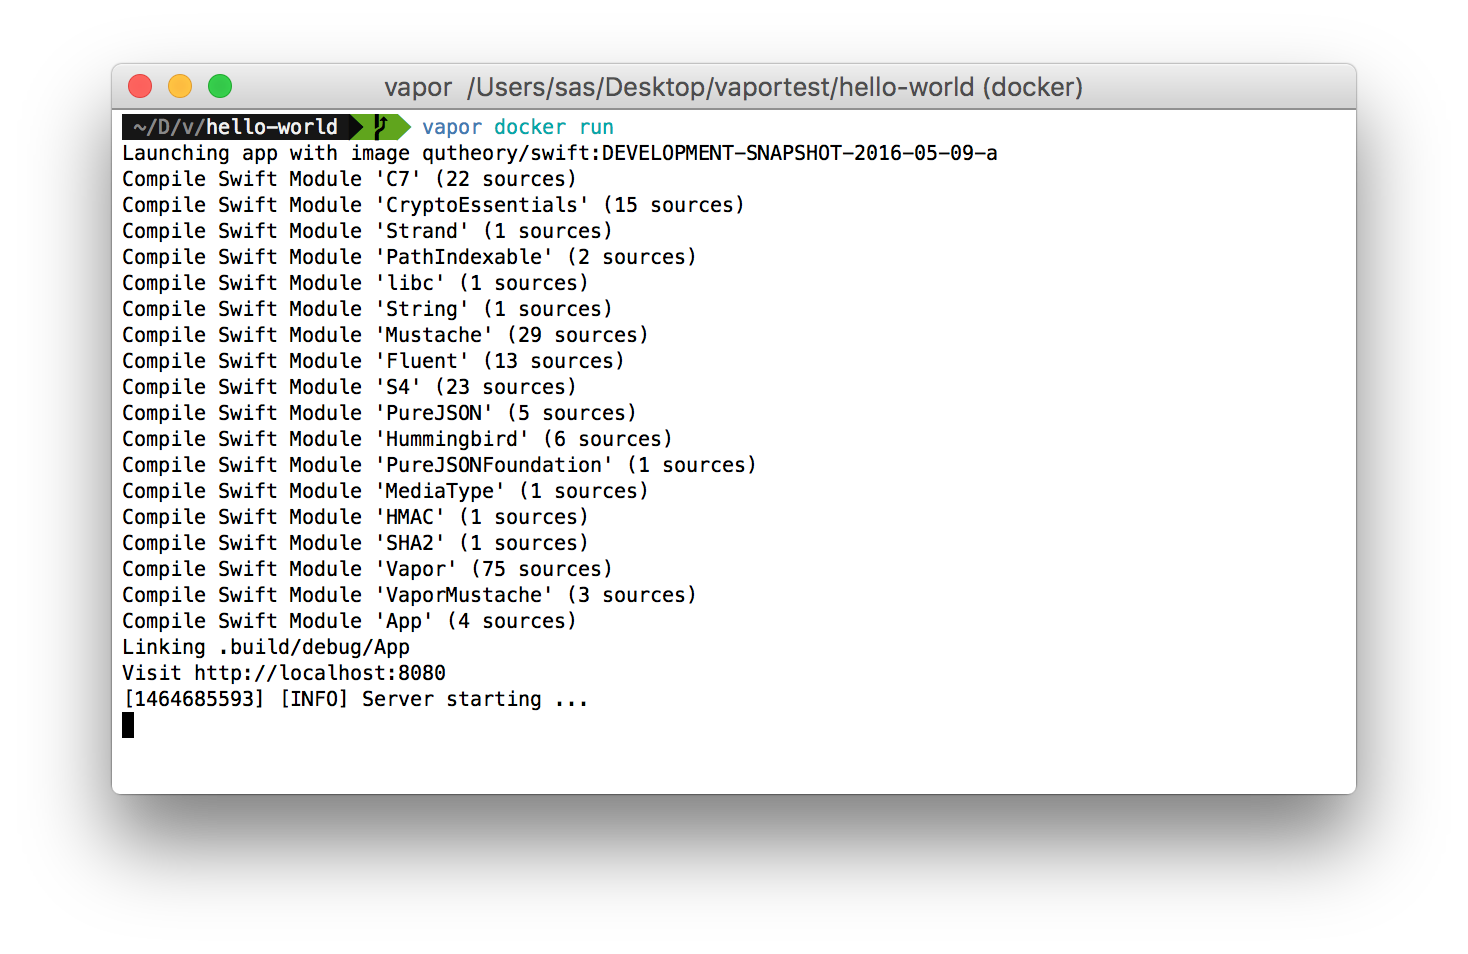
There are two things to note here:
- This is running the app from within the Linux container but it looks pretty much exactly the same as if you had run
vapor buildandvapor runon OSX. - If you are using
Docker Toolboxyou will need to use the ip given bydocker-machine ip <machine name>instead oflocalhostto connect to your app. In the case ofDocker Mac betayou can actually just uselocalhost, making for a very seamless integration.
Entering the Container
Sometimes things go wrong, even in software development 😮. This can be tedious in the best of scenarios, debugging locally, but gets especially hairy when you have to jump through hoops getting to the target system where things actually compile and run.
Vapor’s Docker integration does its best to help you out here by providing an enter command which allows you to start a shell inside your container:
$ vapor docker enter
Starting bash in image qutheory/swift:DEVELOPMENT-SNAPSHOT-2016-05-09-a
root@4256100272f5:/vapor#
Inside, you have access to swift and the local project directory, which is volume mounted to the /vapor directory:
root@4256100272f5:/vapor# which swift
/usr/bin/swift
root@4256100272f5:/vapor# swift --version
Swift version 3.0-dev (LLVM dffa09ffd8, Clang 9f0d189820, Swift 1c720b8f84)
Target: x86_64-unknown-linux-gnu
root@4256100272f5:/vapor# ls
App     Localization   Packages  Public     Resources
Config  Package.swift  Procfile  README.md  VaporApp.xcodeproj
While the vapor command itself is not currently part of the image (and therefore the container) it can easily be installed if you need it. As can anything else, for that matter, since git and wget and range of other common Linux tools are available in the container (and more can be installed by running apt-get … ).
Note, however, that upon leaving the container your changes will be lost. This is the way containers work: unless you use volumes that you mount specifically into the container nothing you do in it on the local storage will be persisted.
The /vapor directory is such a mounted volume, which means changes made here will be reflected in the project directory and therefore live on.
How does this work?
The vapor docker sub command is a thin wrapper around docker with some configuration taken care of for you to make getting started easier.
There are four basic commands vapor docker provides:
| Command | Description | Underlying Command |
|---|---|---|
| init | download the template Dockerfile | curl -L docker.qutheory.io -o Dockerfile |
| build | build an image based on the Dockerfile | docker build --rm -t $IMG --build-arg SWIFT_VERSION=$SWIFT_VERSION . |
| run | build and run the project in the container | docker run --rm -it -v $PWD:/vapor -p 8080:8080 $IMG |
| enter | enter the container | docker run --rm -it -v $PWD:/vapor --entrypoint bash $IMG |
There are two variables used in these commands (apart from $PWD , which is the current working directory, i.e. the project directory):
SWIFT_VERSIONis read and set from the local.swift-versionfile and can have value likeDEVELOPMENT-SNAPSHOT-2016-05-09-afor instance.IMGis the image name used by the sub command, like for examplequtheory/swift:DEVELOPMENT-SNAPSHOT-2016-05-09-a. The name is not hugely important as long as the commands are referring to the same image name. Its significance comes more into play when you start pushing images to registries like Docker Hub.
Deployment
The Docker integration described here is useful for development and testing but is not suitable to deploy applications. See the follow-up post “Deploying a Vapor app on Digital Ocean” about how build and deploy to Digital Ocean.